In my post Out of Disk Space on Drive C–How To Increase Space on Drive C of a Virtual Machine Running Windows Server 2003 I showed how to expand a drive but these instructions do not work if you have a differencing disk or chain of disks. If you want to expand a disk, you have to merge the differencing disks into one single disk. Once this is done, you can easily expand the disk. Let’s look at the Step-By-Step instructions on how to do this.
I am using Windows Server 2008 R2 SP1. I am pretty sure these instructions will work with Windows Server 2008 too.
BEFORE YOU BEGIN: Shutdown your machine and perform an EXPORT. This will serve as a backup in case something goes very wrong. To export Right-Click the machine in Hyper-V Manager and select Export from the menu. Give it a location to store the export and go take a break while it does the export. It is making a complete copy of the machine so it could take some time.
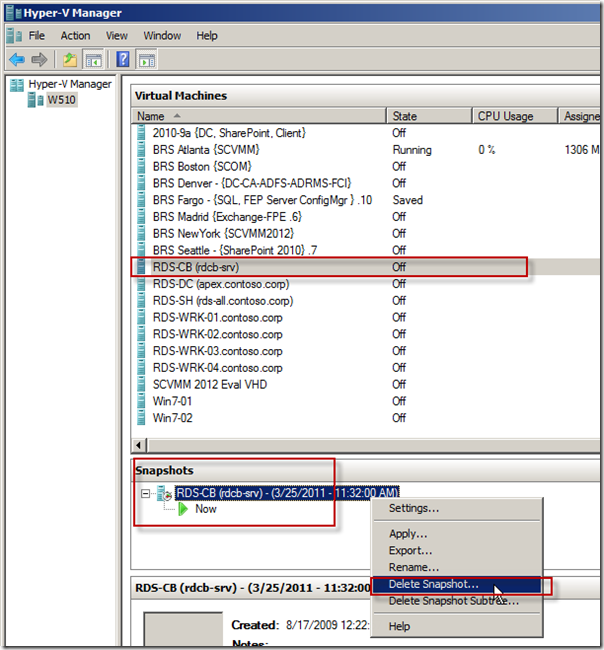
The first thing we need to do is open Hyper-V Manager and make sure the machine does not have any snapshots. If you have any snapshots you will need to delete them. When you do this, you will want to use Delete Snapshot (WARNING: DO NOT delete snapshot Subtree). Delete Snapshot will force a merge of the snapshot which means it saves all changes since the snapshot was taken. WARNING: DO NOT delete snapshot subtree unless you want to lose all changes to the system since the snapshot was taken.
You can view the % complete by scrolling the Hyper-V manager screen Virtual machines list to the right so you can see the “Status” column. You may also find that it is on 99% for a long time… If that happens hit F5 on the keyboard to force a refresh, if it is still working, be patient and let it finish.![]()
The machine will not actually merge the changes unless the machine is turned off. if it is on, shut it down and it will do a merge. If you have more snapshots, you will need to delete all of them. Once the merge is complete (this could take a very long time depending on how long it has been since you took the snapshot.
Now check the disk to see if it is still a chain by looking at the settings of the machine in Hyper-V Manager, click on the disk and select edit.
Then on the Chose Action page, select Merge then click Next. (if merge is not an option, it is likely not a differencing disk and no merges are needed)
On the Merge Changes From Differencing Disk screen you tell it what you want to do with the data in the VHD files. if you chose To the parent virtual hard disk it will merge everything into the parent disk and it will keep the same name as the parent. This method is a bit faster as it does not need to copy the parent, it only needs to copy the children. In my case, I want to merge it into a new file so I click on To a new virtual hard disk. I then give it a path and name. In my case I am using F:Hyper-VDenverNew.vhd. I also want this to be a Dynamic Virtual hard disk so I selected that. Now we can just click Next
It will chug for a some time (depends on size of disk and how many changes were made). If you have multiple disks in the change, you will need to repeat the process for all of the disks in the chain to get it down to a single file. If you have multiple parents, it will only merge one at a time. I have also experienced, if you merge into the parent (instead of into a different file) it does not rename the vhd file so you will need to do that before you like it back to the guest.
The Edit virtual hard Disk wizard will close once it is done merging. Now I have all the data from this server in a single file. I can mount the file in disk manager and manipulate it. To do this: Click Start | Right-click My Computer | select Manage | expand storage | click Disk management | Right-Click Disk Management | Select Attach VHD
This will popup the Attach Virtual hard disk dialog. Select the file and click OK.
This will add a new disk to the system. In my case it mounted a J: drive (Disk 7)
Make sure you detach the VHD. You can do this by Right-click on the far left of the drive image (grey area) and select Detach VHD.
This will close the disk and allow you to move it or reattach it to the Hyper-V VM.
You now have the disks merged into one. Now that the disks are merged, I moved my disk to the Hyper-V guest folder location and then changed the guest machine disk to use this new disk (instead of the chained disk it was using before)
I also expanded and extended the disk (increase capacity) and documented the process at: How To Expand and Extend To Increase Capacity On A Virtual Hard Disk The Easy and Fast Way–Solve the problem of “Out of Disk Space on Drive C” Forever


