Have you seen this incredible tool. Microsoft hit a home run with this little gem. The Azure Cost Estimator Tool will allow you to scan a machine, a virtualization host or even an entire Virtual Machine Manager Network. The Azure (IaaS) Cost Estimator has been designed keeping in mind the need to provide the IT manager of next generation organizations the ability to quickly assess running cost of the existing on-premises workload on Azure. It is not just for on-premises though. If you have hosted servers or servers running on other cloud platforms like AWS, run a scan to see what you can save by moving them to Azure.
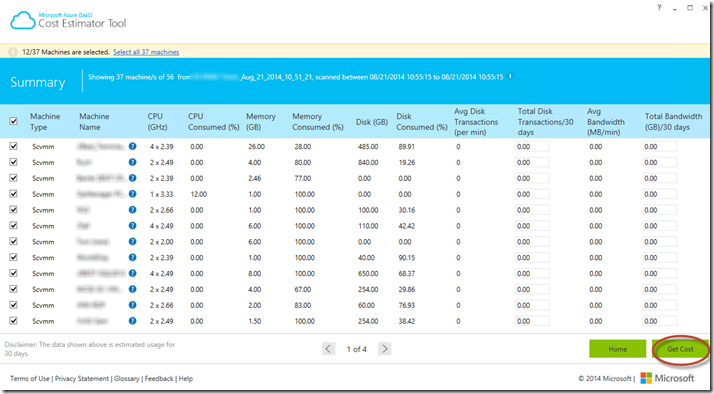
The Azure (IaaS) Cost Estimator Tool does analysis on all the RUNNING computers including virtual machines (selectable) and spits out by machine a bunch of consumption statistics including:
- CPU
- Memory (GB)
- Memory Consumed %
- Disk (GB)
- Disk Consumed %
- Avg Disk Transactions (per min)
- Total Disk Transactions/30 days
- Avg Bandwidth (MB/min)
- Total Bandwidth (GB)/30 days
Click a “Get Cost” button and another feat of software magic happens. It then takes that information, checks the prices on Azure (US) and calculates what the cost of each component on each workload.
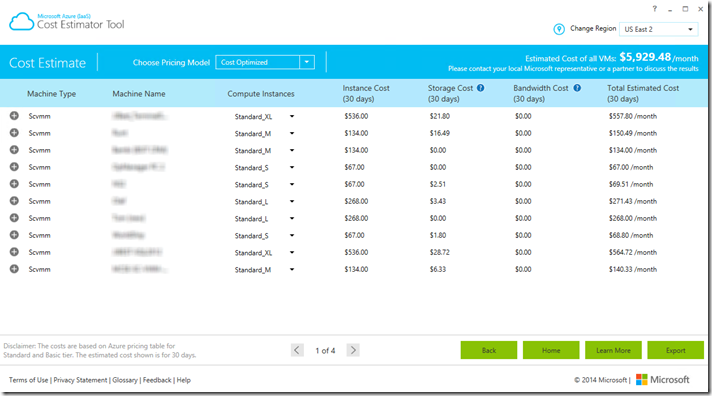
The report gives you:
- Machine Name
- Compute Instance (Size of machine needed in Azure)
- Instance Cost (30 days)
- Storage Cost (30 days)
- Bandwidth Cost (30 days)
- Total Estimated Cost (30 days)
The most impressive stat it gives you is the Estimated Cost of each VM as well as the “Estimated Cost of all VMs”. This is an excellent tool for understanding what the cost would be to move one, many or all workloads into Azure. If you want to play with the numbers, do some of your own What-If analysis on the servers, try changing the size of one of the servers to a smaller or larger size and see how the prices changes. This way if the tool recommends you go with a Standard_XL but you think Standard Large would be sufficient you can easily get the updated numbers. If you want to dig deeper into the data you can. Simply hit the Export button in the lower right corner to create a file that can be brought into Excel to do some more intense analysis.
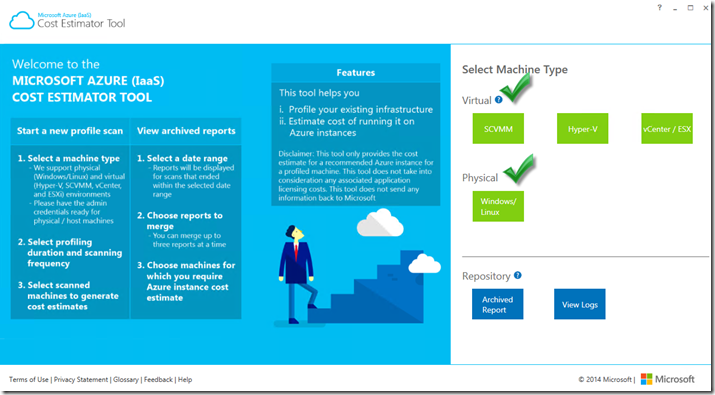
In my screenshots above you will see that the machine type was SCVMM. That means I used the tool to scan SCVMM for all running VMs SCVMM knows about. The tool supports running against:
- Microsoft technologies (Hyper-V, SCVMM)
- VMware technologies (vCenter, ESXi)
- Physical environments (Windows, Linux)
It is able to export to Excel/.csv that can be used for discussions with Systems Integration partner or a Microsoft representative. No data is sent to Microsoft at any time. All report and profile information resides on the machine where the tool is installed. Did I mention the tool does not need to run on a server? You can run it on your workstation and scan your servers. You just need credentials to the server it will be running against. See below for step by step.
The report I ran in the above example was against an SCVMM box. It ran with 37 machines running and collected all the information one time which took only a few minutes. Wow that was fast. However, fast is not always accurate because it is a point in time view of the usage. We all know that usage is not always the same from one minute to the next, one hour from the next or one day from the next. Therefore, when you run a scan you have an option of selecting the Profiling Duration (hours, days, weeks) as well as the scanning frequency (hours ) it is best to run for a longer period of time with multiple scanning frequencies to get the most accurate numbers possible.
No better time than the present to get started here is the Step-By-Step…
Microsoft Azure (IaaS) Cost Estimator Tool Step-By-Step
- Download the Microsoft Azure (IaaS) Cost Estimator Tool from the Microsoft download Center
- Install by Running the “Microsoft Azure (IaaS) Cost Estimator Tool.msi” file to install the application on any windows computer that is on the same network of the machines you want to scan
-
 Click Next on the Welcome Screen
  Accept the license agreement and click Next
 Change the path if you like or just click Next
 Click Install
  Once finished, turn on the checkbox to Launch the application then click Finish
 The Cost Estimator tool will run in a different window space.
- Start your Scan
 if you chose Physical (Windows/Linux) you will be asked for what type (Windows/Linux), IP Address, username and password. You can scan up to 25 machines in a single pass.
 If you chose Hyper-V or one of the other options you Enter information on a single machine then click Begin Profiling
- IP Address
- Username
- Password
- Profiling Duration
- Scanning frequency
-


- After the report runs you can View Report
 A message will popup letting you know you can modify settings if you thing the values estimates are not accurate
 you can enter your own estimates for some of the data if you like. When ready, just click Get Cost
 You can change the calculated size of a machine by clicking the dropdown next to the machine. Notice the price automatically changes.
  Notice you can also change the pricing model from Cost Optimized to VM Allocated or Performance Optimized and watch the price change immediately.


